Quarkus Neo4j: How to build a Quarkus app with Neo4j
- 8 minutes read - 1497 wordsI’ve recently been working on expanding my horizons in different Java frameworks, and Quarkus was on my list to try.
Quarkus is a Kubernetes-native Java framework designed to reduce an application’s footprint, ideal for addressing challenges in deploying, running, and maintaining applications in cloud-based environments.
It has become a major player in list of frameworks, so naturally, I wanted to try it out! I started by following the first few steps in this blog post, as it outlines how to get a project up and running and the dependency needed for Neo4j. I felt the Quarkus Neo4j documentation was a bit overly complicated and verbose for a starter app.
All of the code for this blog post is available in the quarkus-coffee-shop Github repository.
Note: I also have a sister project using Spring Data Neo4j, for comparison. :)
Creating a project
Similar to the Spring Initializr that offers a web interface for defining a project and its dependencies, Quarkus has https://code.quarkus.io/. Quarkus also offers a CLI, which would be especially helpful for creating multiple projects quickly.
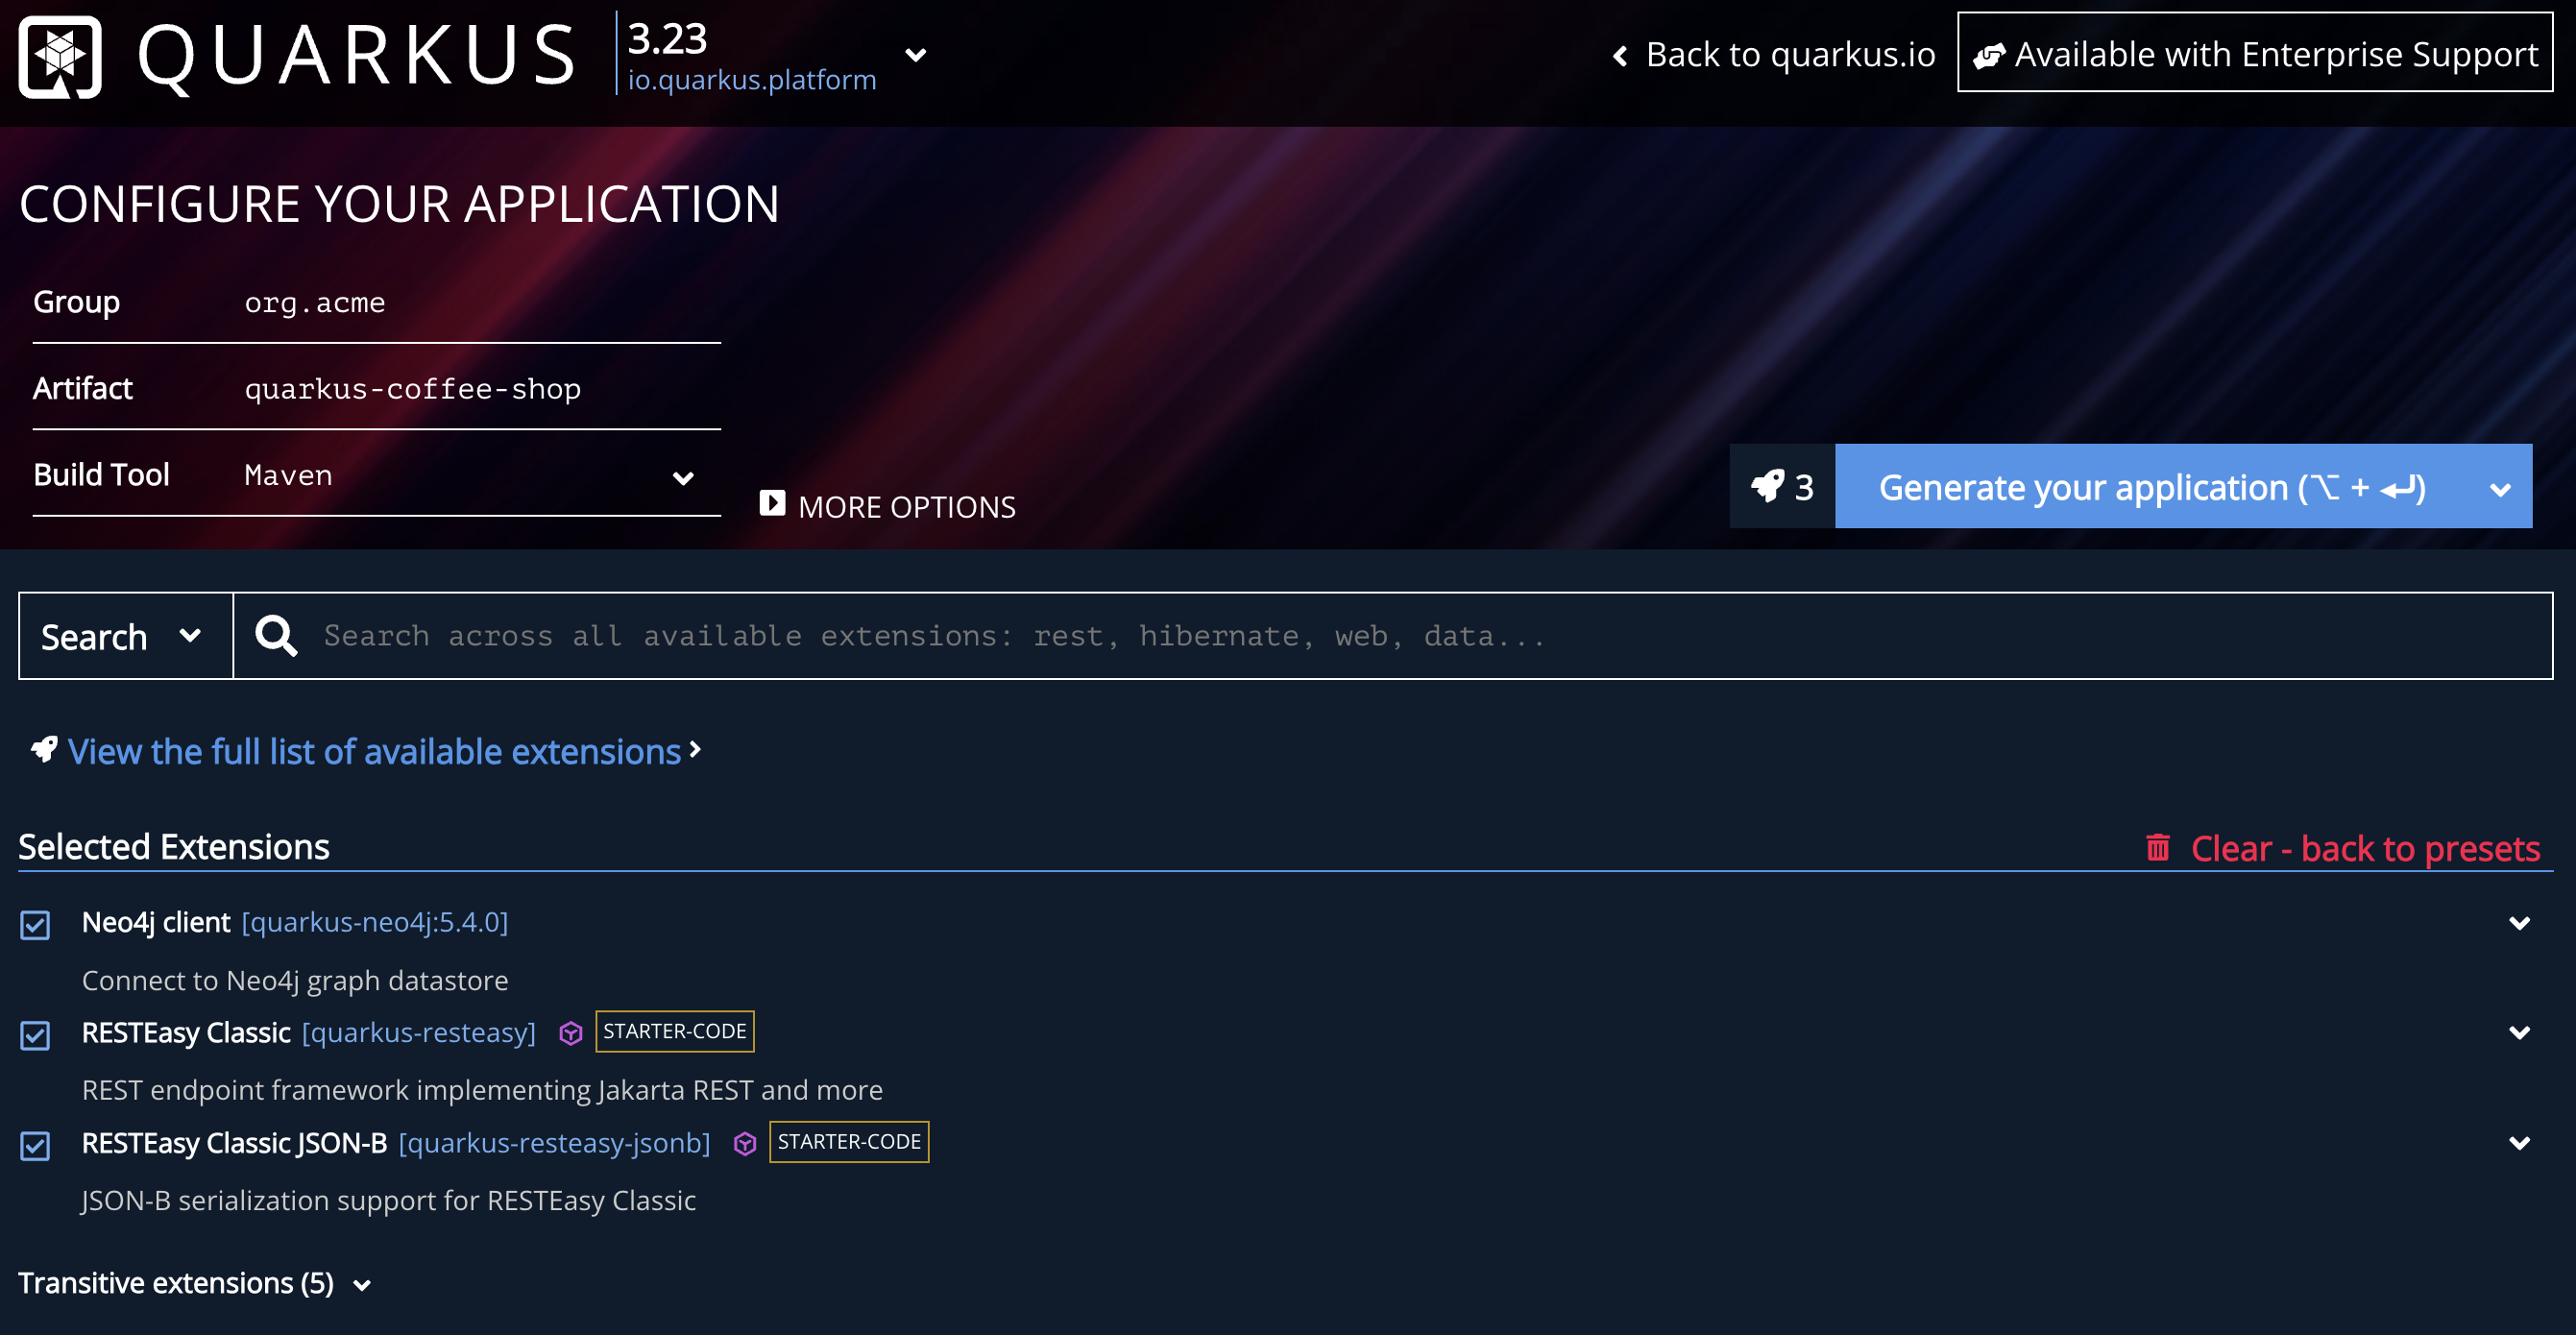
On code.quarkus.io, I filled out the project name, and then added three dependencies for the Neo4j client, RESTEasy Classic, and RESTEasy Classic JSON-B. Once that is complete, click the Generate your application blue button to download the .zip file.
Next, unzip the folder and open it in your preferred IDE. The project template includes a GreetingResource class with a default /hello endpoint, so we can run the application and call the endpoint to see a message.
./mvnw quarkus:devhttp ":8080/hello"
Hello RESTEasySetup
However, to build out our application, there are a couple of adjustments needed to the pom.xml. To utilize object graph mapping capabilities, we need to include the neo4j-ogm-quarkus library, which currently (v3.14.0) is only compatible with Quarkus 3.22.1.
Note: There is an open Github pull request for 3.23, which may be released soon.
So, we need to downgrade Quarkus’s platform version in order to use OGM (for now). Open the pom.xml, then navigate to the <properties> section and change the quarkus.platform.version property to version 3.22.1, as shown below.
<properties>
    <quarkus.platform.version>3.22.1</quarkus.platform.version>
</properties>
Next, add the following library to the <dependencies> section.
<dependency>
    <groupId>org.neo4j</groupId>
    <artifactId>neo4j-ogm-quarkus</artifactId>
    <version>3.14.0</version>
</dependency>
Next, we need a Neo4j database and to connect to the instance from our application.
Creating and connecting to an instance of Neo4j
If you don’t have one already, spin up a free cloud instance of Neo4j Aura.
Once the instance is running, load the data by clicking on the Query tool along the left console menu, then copy the contents of the coffee shop import script and paste into the input box at the top of the window. Click the play button on the right of the input box and wait for all steps to complete.
Back in the Quarkus application, open the src/main/resources/application.properties file to add configuration for connecting to Neo4j.
# Neo4j config
quarkus.neo4j.uri=<NEO4J_URI>
quarkus.neo4j.authentication.username=<NEO4J_USERNAME>
quarkus.neo4j.authentication.password=<NEO4J_PASSWORD>

# OGM config
org.neo4j.ogm.use-native-types=true
The first three properties should match the URI, username, and password for the Neo4j instance. The final property is so that OGM will map temporal data types (dates and times) correctly.
The next step is to create the domain classes for Order, Receipt, Staff, and Customer entities.
Domain classes
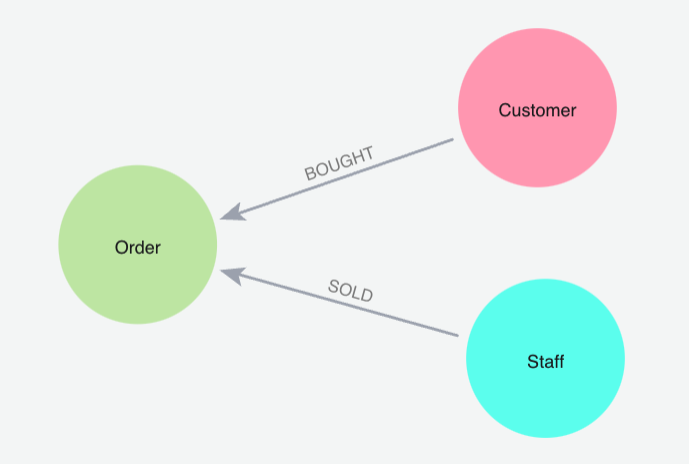
The domain model for this application contains 4 main entities and the relationships between them.
We will map the Order entity first. Create a new file named Order.java and define the class as follows.
import java.time.LocalDate;
import java.time.LocalTime;

import org.neo4j.ogm.annotation.Id;
import org.neo4j.ogm.annotation.NodeEntity;
import org.neo4j.ogm.annotation.Relationship;

@NodeEntity
public class Order {
    @Id
    private String transactionId;
    private String orderId;
    private LocalDate orderDate;
    private LocalTime orderTime;
    private String inStore;

    //make OGM happy
    public Order() {
    }

    public Order(String transactionId) {
        this.transactionId = transactionId;
    }

    //getters and setters
}
The @NodeEntity annotation is for OGM to map this class to an Order node in Neo4j, and the @Id annotation pinpoints the id field for the class. After the class variables for orderId, etc, we have to create an empty constructor, as well as a required parameter constructor for OGM. Then, the getters and setters follow.
Next, let’s define the Staff.java and Customer.java classes.
@NodeEntity
public class Staff {
    @Id
    String staffId;
    String firstName;
    String lastName;
    LocalDate startDate;

    public Staff() {
    }

    public Staff(String staffId, String firstName, String lastName, LocalDate startDate) {
        this.staffId = staffId;
        this.firstName = firstName;
        this.lastName = lastName;
        this.startDate = startDate;
    }

    //getters and setters
}@NodeEntity
public class Customer {
@Id
private String customerId;
private String customerName;
private String loyaltyId;
public Customer() {
}
public Customer(String customerId, String customerName, String loyaltyId) {
this.customerId = customerId;
this.customerName = customerName;
this.loyaltyId = loyaltyId;
}
//getters and setters
}These classes are similar to Order, so the code shouldn’t contain any surprises.
Relationships
The next step is to define relationships. While we can directly define the relationship by adding a new variable to point to the other entity, this domain also contains relationship properties between Order and Customer that hold information on how many items the customer ordered and the total amount for the order.
To map these properties, we need another class that holds the receipt information.
import org.neo4j.ogm.annotation.EndNode;
import org.neo4j.ogm.annotation.GeneratedValue;
import org.neo4j.ogm.annotation.Id;
import org.neo4j.ogm.annotation.RelationshipEntity;
import org.neo4j.ogm.annotation.StartNode;

@RelationshipEntity("BOUGHT")
public class Receipt {
    @Id @GeneratedValue
    private Long id;

    private Integer itemsInOrder;
    private Double orderTotal;

    @StartNode
    private Customer customer;

    @EndNode
    private Order order;

    //getters and setters
}
The @RelationshipEntity maps this class to the BOUGHT relationship in Neo4j. @Id and @GeneratedValue define the id and note that it’s an internally-generated id. Two class variables hold the number of items and order total. Then, the @StartNode and @EndNode point to the starting and ending entities for the relationship.
Finally, we can connect these pieces together by mapping the relationships from the Order.java class.
@NodeEntity
public class Order {
    //previous class variables

    @Relationship(value = "BOUGHT", direction = Relationship.Direction.INCOMING)
    private Receipt receiptAndCustomer;
    @Relationship(value = "SOLD", direction = Relationship.Direction.INCOMING)
    private Staff staff;

    //constructors

    //getters and setters
}
There are two definitions - one for each relationship. The @Relationship annotation defines the relationship type (BOUGHT or SOLD) and the direction (both incoming to the Order node). Those are mapped to class variables that return the entity type (Receipt and Staff).
These definitions map connections from the Order class to related entities. Now we need to define a repository and resource to retrieve entities from the database and create endpoints for us to access it.
Repository class
Create an OrderRepository.java and populate it with the following code:
import java.util.Map;
import org.neo4j.ogm.session.SessionFactory;
import jakarta.enterprise.context.ApplicationScoped;

@ApplicationScoped
public class OrderRepository {
    private final SessionFactory sessionFactory;

    OrderRepository(SessionFactory sessionFactory) {
        this.sessionFactory = sessionFactory;
    }

    Iterable<Order> findTenOrders() {
        return sessionFactory.openSession().query(Order.class,
            "MATCH (order:Order)<-[rel:BOUGHT]-(c:Customer), " +
                "(order)<-[rel2:SOLD]-(s:Staff) " +
                "RETURN order, collect(rel), collect(c), collect(rel2), collect(s) LIMIT 10;",
            Map.of());
    }
}
The @ApplicationScoped annotation will share this repository bean across the application. Inside the class, we inject the OGM SessionFactory into the class to handle connections to Neo4j.
Next, we define a method to find 10 orders. The query retrieves customers who bought orders, and staff who sold those orders. By returning the order nodes and collecting related entities, unique patterns (orders) are returned. OGM will map returned nodes and relationships accordingly.
Finally, we need an endpoint to access this information.
Resource (i.e. Controller) class
Quarkus uses the term Resource rather than Controller, so the OrderResource.java will handle the user interface by creating a REST api.
import jakarta.enterprise.context.RequestScoped;
import jakarta.inject.Inject;
import jakarta.ws.rs.GET;
import jakarta.ws.rs.Path;
import jakarta.ws.rs.Produces;
import jakarta.ws.rs.core.MediaType;

@RequestScoped
@Path("/orders")
public class OrderResource {
    private final OrderRepository orderRepository;

    @Inject
    public OrderResource(OrderRepository orderRepository) {
        this.orderRepository = orderRepository;
    }

    @GET
    @Produces(MediaType.APPLICATION_JSON)
    public Iterable<Order> getOrders() {
        return orderRepository.findTenOrders();
    }
}
First, the @RequestScoped narrows this bean to each request, and the @Path defines the root url of /orders. Within the class, there is a variable for the repository and it’s injected into the class constructor, so that we can call the query method we wrote earlier.
Next, we define the getOrders() method as a HTTP GET method that will return multiple orders (Iterable<Order>) in JSON output @Produces(MediaType.APPLICATION_JSON). The method will call the repository’s findTenOrders() method.
Now we can test the application!
Run and test the application
Run the application in dev mode with the following command:
./mvnw quarkus:devWe can test the default /hello endpoint (GreetingResource), as well as the /orders endpoint (OrderResource), which retrieves 10 order entities (and their related entities) from Neo4j:
http ":8080/hello"

http ":8080/orders"
Wrapping up!
In this blog post, we walked through the following:
How to create a Quarkus application using the Quarkus project online tool.
How to connect to Neo4j.
How to map domain entities to Neo4j with OGM.
How to run queries in Neo4j and access the data via a REST endpoint.
This project is a jumping point into so many other facets, and I’ll be sure to bring you along for the ride.
Happy coding!
Resources
Github repository: Accompanying code for this blog post
Documentation: What is Quarkus?
Data set: Coffee shop graph data
Documentation: Quarkus Neo4j
Github repository: Neo4j Quarkus OGM library